You can use the AusUDID portal to create, review, edit and manage UDI records.
To be able to submit UDI records:
- you must log in using your TBS account
- you must hold the TBS system role of Drafter or Submitter to draft UDI records
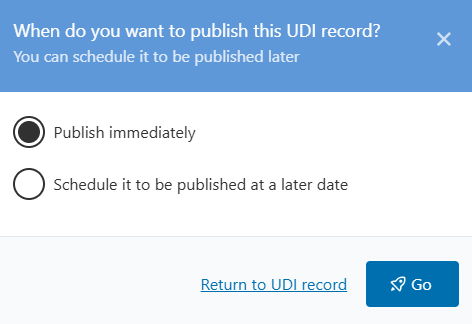
- you must hold the TBS system role of Submitter to publish UDI records.
For more information on roles, see: AusUDID roles and responsibilities.
For more information on logging into the AusUDID, see: Accessing the AusUDID.
Tips
Before submitting UDI records to AusUDID Production:
- gather all data before you begin
- use the Australian UDI Data Dictionary to understand data elements and rules
- test your submissions in the AusUDID Pre-Production environment before submitting to AusUDID Production.
Creating UDI records
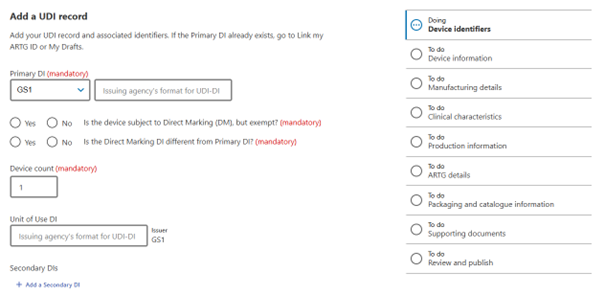
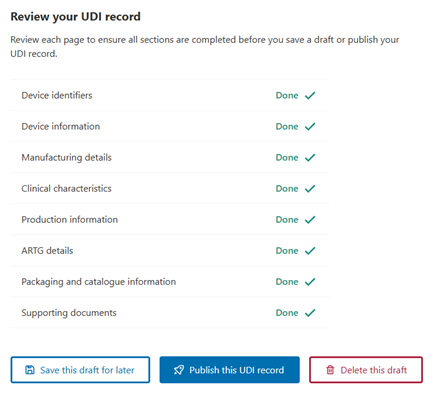
To draft and publish UDI records:
- Log into the AusUDID.
- Select the Add UDI record tab in the UDI Management Centre.
Figure 1: 'Add UDI record' tab
Screenshot of UDI Management Centre navigation menu with tabs for Overview, My UDI records, My drafts, Add UDI record, Link my ARTG ID, Bulk uploads, and Manage documents.
A red box highlights the ‘Add UDI record' option to indicate that this is the action you need to take.
Figure 2: UDI record
- Enter all required information in each section of the UDI record.
You must complete each mandatory field and any relevant conditionally mandatory fields. We strongly encourage you include optional fields to make your UDI record useful for end users, such as healthcare.
Figure 2: UDI record
Screenshot of the categories of UDI record information to do. This includes:
- Device identifiers
- Device information
- Manufacturing details
- Clinical characteristics
- Production information
- ARTG details
- Packaging and catalogue information
- Supporting documents
- Review and publish
Figure 3: UDI record with all sections completed
- Once you have completed each section, you can:
- save your draft for later, or
- publish your UDI record.
Figure 3: UDI record with all sections completed
A screenshot of a draft UDI record with green ticks indicating each section is completed.
Figure 4: UDI record publishing options
If you choose to publish your UDI record, you can:
- publish your UDI record immediately, or
- publish your UDI record at a later date.
Figure 4: UDI record publishing options
Screenshot of the pop-up that appears after selecting 'Publish this UDI record' button.
There are 2 options available: 'Publish immediately' or 'Schedule it to be published at a later date'.
Figure 5: UDI record successfully published notification
Once you have published your UDI record, you can:
View or edit the newly published UDI record
See all other draft UDI records
Create a new UDI record
Create a new UDI record based on this one.
Figure 5: UDI record successfully published notification
UDI record successfully published notification, with options to:
- View or edit the newly published UDI record
- See all other draft UDI records
- Create a new UDI record
- Create a new UDI record based on this one.
Reviewing UDI records
To review your UDI records:
- Log into the AusUDID.
- Select the My UDI records tab.
Figure 6: 'My UDI records' tab
Screenshot of UDI Management Centre navigation menu with tabs for Overview, My UDI records, My drafts, Add UDI record, Link my ARTG ID, Bulk uploads, and Manage documents.
A red box highlights the ‘My UDI records' option to indicate that this is the action you need to take.
Figure 6: 'My UDI records' tab continued
- Review the UDI records published by your organisation by selecting or searching for a UDI record.
For more information on viewing UDI records, including searching and downloading UDI records, see: Searching, viewing and downloading UDI records in the AusUDID.
Editing UDI records
To edit UDI records:
Log into the AusUDID.
Select the My UDI records tab.
Figure 8: 'Edit device' button
- Select the UDI record you wish to edit. You can search for a specific UDI record using the search bar or filters.
- In the UDI record, select Edit device.
Figure 8: 'Edit device' button
UDI record with the Edit Device button highlighted.
Figure 8: 'Edit device' button continued
- Edit the UDI record as required. Note that:
- If you are changing a UDI Trigger data element, you must edit the UDI record as a Correction and provide a reason for the change. You must not update UDI Trigger data elements if they have changed, and instead you must obtain a new UDI-DI and create a new UDI record.
- If you are changing a non-UDI Trigger data element, you can either update the UDI record or correct the UDI record, depending on whether the change is fixing a data entry error or updating the UDI record with new data.
Note:
You must provide a reason for corrections in the AusUDID. Use of this feature may be monitored by the TGA.
Deleting UDI records
Generally, you should not delete UDI records as the lifetime and use of many devices extend beyond the period of supply. If a device is no longer supplied, you must update the Sponsor Commercial Distribution End Date instead.
However, you may delete a UDI record if it is:
- test data in AusUDID Pre-Production
- a duplicate
- created by accident.
Note:
Deleted UDI records may be reviewed by the TGA.
To delete a UDI record:
Log into the AusUDID.
Select the My UDI records tab.
Figure 10: Delete UDI record example
- Select the UDI record you wish to delete.
- In the UDI record, select the Device actions section in the right-hand side menu. Select Delete this device permanently.
Figure 10: Delete UDI record example
Screenshot of a UDI record showing the Device Actions page and Delete UDI record button.
Figure 10: Delete UDI record example continued
Note:
Deleted UDI records cannot be recovered.
Page history
Original publication